Windows 8 can be installed in the latest version of vmware (workststion 8.0.4) and it works awesome in it.
The major requirement is that you laptop/pc must have atleast 2 GB of RAM, as in less it would work too slow.
 |
| windows 8 release preview on vmware workstation 8 |
Creating it on vmware has become a very easy task, every step is quite easy and understandable,
the latest version of vmware is too easy to use, and its steps are too well defined in itself.
But for those who have never used it, there is a step by step demonstration of creating it,
first of all buy the latest version of vmware workstation(vmware workstation 8.0.4 build-744019)
and install it,
Rest of the step is desribed below
CREATING VMWARE IMAGE OF WINDOWS 8
Step 1: Select file > new virtual machine, another window will open for creating the virtual machine
you can select custom to create virtual machine for older version and with specified settings,
but if you want to run it only on vmware 8 then select standard.
then click on next...., for step 2
( Here I am explaining the custom mode )
 |
| step 1: configuration selection |
Then click on next for step 3
 |
| step 3: workstation compatibility |
(in this demonstration i will explain the third option)
then click on Next..... for next step,
 |
| step 3: selecting boot device |
then click next....
 |
| step 4: select OS type |
Step 5: In fifth step, browse to the location for storing Virtual Machine, and edit the name of that virtual machine.
then click on next,..
 |
| step 5: selcting location |
 |
| step 6: No. of processor selection |
after that click on next,
 |
| step 7: allocate RAM |
for private network only with the host, select host-only,
or use NAT for direct connection to your internet,
use bridge for treating it as an computer,
or you can select dont use network for no network with anything.
then click next...
Step 9: Next step is to select the scsi controller type, select LSI logic and click next.
Step 11: If you have large disk space then select allocate all disk space now,
else you can select either of the next two, then press next,
and for size of disk allocate atleast 60GB of hard disk,..
or you can select dont use network for no network with anything.
then click next...
 |
| step 8:select network type |
 |
| step 9: select SCSI controller |
Step 9: In this step you can choose the disk in which we want to place the virtual machine,
to create new virtual machine select create new virtual disk an press next...
 |
| step 9: select disk |
Step 10: Select the recommended disk type (i.e, IDE) and press next,
 |
| step 10: Selct kind of disk |
Step 11: If you have large disk space then select allocate all disk space now,
else you can select either of the next two, then press next,
and for size of disk allocate atleast 60GB of hard disk,..
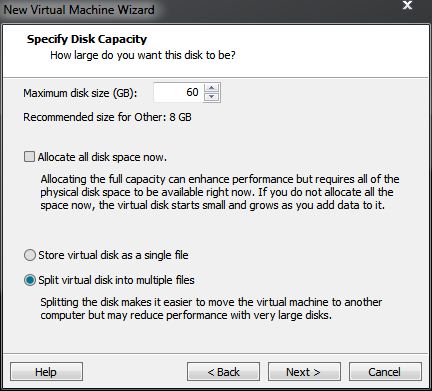 |
| step 11: selecting size of disk |
Step 12: Edit the name of virtual machine.
 |
| step 12: edit name of virtual machine name |
Step 13: The newly created virtual machine configuration will be shown, click on finish,..
 |
| finish: virtual machine configuration |
Step 14: Now the newly created virtual machine will appear on virtual machine,now the next step will be to boot the created virtual machine in the next step..
 |
| created virtual machine |
Step 15: Now, select the location where you have the windows 8 dvd or you can browse to the iso image.
click on OK, then power on the machine.
The virtual machine got created and now you can install it as regular installation of OS.
At last when the installation gets finished change the CD/DVD location to use physical drive.
and your newly installed windows 8 is ready to use.
 |
| select the boot device or ISO image |